Logic Apps Setup
This section covers the creation and configuration of Logic Apps that orchestrate the provisioning workflow between ROI iAM and Microsoft Entra.
Logic Apps Overview
Create the following Logic Apps under Resource group: ROI_LogicApps_RG
| Logic App | Purpose |
|---|---|
| ROI_Scheduler | Schedules Logic App runs |
| ROI_AppRoles | Retrieves roles from ROI iAM via SCIM and creates application roles and access packages in Entra |
| ROI_UsersAndAccess | Retrieves users and assignments from ROI iAM via SCIM and creates connections to application roles and access packages |
| ROI_CallBack | Captures and processes callbacks from ROI iAM for asynchronous event communication |
| ROI_Provisioning | Processes asynchronous events to ROI iAM for user lifecycle and access management |
| ROI_Trigger_Provisioning | Used for custom extensions in catalogs (created manually - see below) |
| ROI_Calculate_DynamicGroup_Provisioning | Checks for users added to dynamic groups and triggers ROI_Provisioning on membership changes |
| ROI_PublishEvent | Publishes events to ROI iAM (used by ROI_Provisioning and ROI_Calculate_DynamicGroup_Provisioning) |
Create Logic Apps from Templates
For all Logic Apps except ROI_Trigger_Provisioning, follow these steps:
Deployment Steps
- Open the Azure Template Deployment.
- Click "Build your own template in the editor".
- Click Load File → Upload the respective ROIAM template.
- Select Resource Group:
ROI_LogicApps_RG. - Select Region: Closest to you.
- Click Review + Create → Create.
Important
After each Logic App is created:
- Go to Settings → Identity → Copy/Save the Object (principal) ID
- This ID will be needed for permission assignments
Create ROI_Trigger_Provisioning Logic App
The ROI_Trigger_Provisioning Logic App is a special type that must be created manually and cannot be imported from a template.
Manual Setup Steps
- Open the ROI_Trigger_Provisioning Logic App in the Azure portal.
- Go to Deployment tools → Logic app designer.
- Click + → Add a new action of type HTTP.
- Rename the action to Call ROI Provisioning.
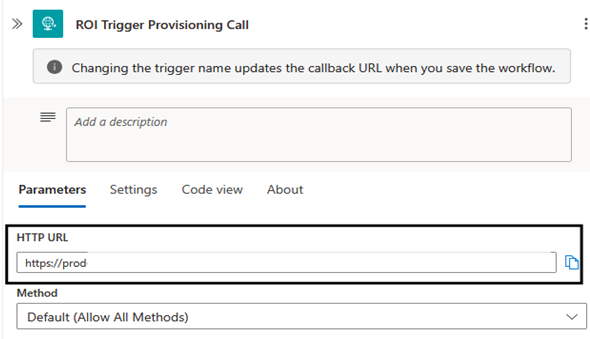
Get the HTTP POST URL
To configure the HTTP action, you need the URL from the ROI_Provisioning Logic App:
- Open the ROI_Provisioning Logic App in the Azure portal.
- Go to Deployment tools → Logic app designer.
- Find and select the trigger called ROI_Trigger Provisioning Call.
- Copy the HTTP POST URL.
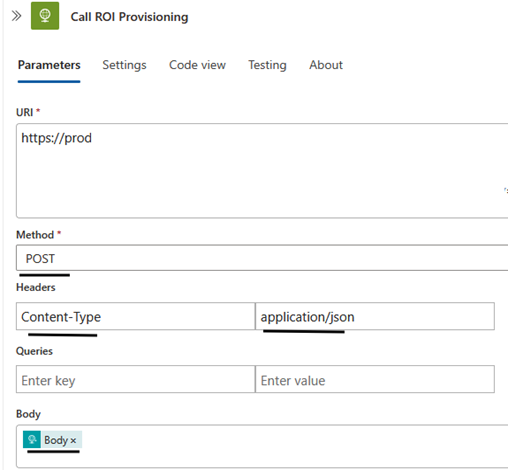
Configure the HTTP Action
Back in the ROI_Trigger_Provisioning Logic App:
- Paste the copied URL into the URL field of the HTTP action.
- Set Method:
POST. - Add Headers:
- Key:
Content-Type - Value:
application/json
- Key:
- Set Body:
@{triggerBody()}.
Logic Apps Permissions
Each Logic App and Azure Function uses a Managed Identity that requires specific permissions at three levels.
Permission Levels Overview
1. Azure Resource Permissions (RBAC)
Storage Table Data Contributor (assigned at Storage Account scope)
- Allows reading and writing data in Azure Table Storage.
Key Vault Administrator (assigned at Key Vault scope)
- Allows reading and managing secrets, keys, and certificates.
- Only works if the Key Vault is in RBAC mode.
2. Entra ID Directory Roles
Identity Governance Administrator
- Required for working with access packages, catalogs, and entitlement management.
Application Administrator
- Required for creating and managing enterprise applications and app registrations.
Note
These are tenant-wide roles, making the managed identity an admin for these areas.
3. Microsoft Graph Application Permissions
The following application permissions are required on the Microsoft Graph service principal:
| Permission | GUID |
|---|---|
Group.ReadWrite.All | 62a82d76-70ea-41e2-9197-370581804d09 |
Application.ReadWrite.All | 1bfefb4e-e0b5-418b-a88f-73c46d2cc8e9 |
EntitlementManagement.ReadWrite.All | 9acd699f-1e81-4958-b001-93b1d2506e19 |
Directory.ReadWrite.All | 19dbc75e-c2e2-444c-a770-ec69d8559fc7 |
AppRoleAssignment.ReadWrite.All | 06b708a9-e830-4db3-a914-8e69da51d44f |
CustomAuthenticationExtension.ReadWrite.All | c2667967-7050-4e7e-b059-4cbbb3811d03 |
AuditLog.Read.All | b0afded3-3588-46d8-8b3d-9842eff778da |
These provide the full set of Graph operations needed for provisioning, managing applications, groups, and entitlement management.
Automated Permission Assignment
To avoid manual permission assignments, use the PowerShell script ROIAM_Assign-Permissions.ps1.
What the Script Does
- Connects to Azure and Entra ID.
- Lets you select the subscription where the resources live.
- Prompts for Managed Identity Object IDs (for Logic Apps and Functions).
- Prompts for Storage Account and Key Vault names.
- Assigns all required permissions:
- Azure RBAC roles (Storage Table Data Contributor, Key Vault Administrator)
- Entra ID directory roles (Identity Governance Administrator, Application Administrator)
- Microsoft Graph app roles (listed above)
Steps to Run the Script
Download the script to your local machine as
ROIAM_Assign-Permissions.ps1.Open PowerShell 7 as Administrator.
Run the script:
powershell.\ROIAM_Assign-Permissions.ps1Follow the interactive prompts:
- Sign in to Azure (device code login).
- Choose the subscription.
- Enter the Object IDs of each Logic App/Function identity (press Enter with no input when done).
- Enter the Storage Account Name.
- Enter the Key Vault Name.
Wait for confirmation - the script reports
Completedwhen done.
Manual Configuration Required
After running the script, each Logic App must still be manually configured to:
- Use the designated Storage Account.
- Use the designated Azure Key Vault.
- Update with its unique trigger URL for communication with other Logic Apps.
Create Service Principal for Token Authentication
A service principal is required for token-based authentication between ROI iAM and Entra.
Register a New Application
- Navigate to Microsoft Entra Admin Center → Identity → Applications → App registrations → New registration.
- Name the app:
ROI_TOKEN_APP. - Choose: Accounts in this organizational directory only (Single tenant).
- Click Register.
Assign Required API Permissions
- Go to API permissions.
- Click Add a permission → Microsoft Graph → Application permissions.
- Add the following permissions:
AppRoleAssignment.ReadWrite.AllDirectory.Read.AllUser.Read.AllGroup.Read.AllApplication.ReadWrite.AllAppCatalog.ReadWrite.All
- Click Add permissions.
- Click Grant admin consent for your tenant.
Generate a Client Secret
- Go to Certificates & secrets.
- Under Client secrets, click New client secret.
- Enter a description and choose an expiry → Click Add.
Important
Copy the Client Secret value immediately - it will be hidden after leaving the page.
Collect Application Details
- Go to Overview.
- Copy the Application (client) ID.
Remember
The Client ID and Client Secret are used for calls from ROI iAM to Entra.
Next Steps
Now that the Logic Apps are configured, continue to Azure Tables Configuration to set up the table structure and import the required data.