Installation / Update
The sections below describe the steps for a fresh installation or an update of ROI iAM in an SAP IdM environment.
NWA deployment and configuration
Prepare deployment files
- Ensure that
com.roiable.roiam.idm-proxy-<version>.earhas been provided by ROIABLE.
- Ensure that
Deploy ROI iAM Proxy
- Deploy the ROI iAM Proxy to the SAP NetWeaver Application Server Java (NWA), using telnet or any other standard method for deploying the
.earfile.
- Deploy the ROI iAM Proxy to the SAP NetWeaver Application Server Java (NWA), using telnet or any other standard method for deploying the
Create datasources in NWA
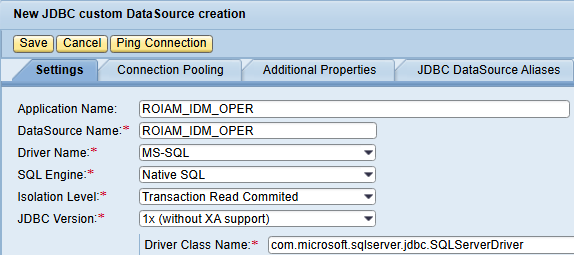
- Create the following datasources as "New JDBC Custom DataSource":
ROIAM_IDM_RT– runtime connection to the IdM database.ROIAM_IDM_OPER– oper connection to the IdM database.
- Create the following datasources as "New JDBC Custom DataSource":
IdM initial configuration
Prepare ROI iAM IdM packages
- Ensure you have the ROI iAM IdM packages provided by ROIABLE.
com.roiable.roiam.connector.<version>.idmpckcom.roiable.roiam.forms.<version>.idmpckcom.roiable.roiam.hub.<version>.idmpck
- Ensure you have the ROI iAM IdM packages provided by ROIABLE.
Import HUB package
- Import the
com.roiable.roiam.hubpackage into the target SAP IdM Identity Store. - Create a repository named
ROIAM_HUB_<landscape>using repository typeROIAM_HUB. - In IdM Developer Studio, execute the repository job "Generate ROI iAM HUB data" for the newly created repository.
- Import the
Create ROI iAM users in UME
Create user ROIAM_APPR in UME and grant the following UME roles:
IDM_UserIdm.userIdm.monitoring
Create communication user ROIAM_TECH and assign UME role
RoiamIdmProxy.
Import connector and forms packages
INFO
Import might fail if the previous three steps are not fully completed.
- Import the following packages into the SAP IdM Identity Store:
com.roiable.roiam.connectorcom.roiable.roiam.forms
- Import the following packages into the SAP IdM Identity Store:
Enhance the MX_PRIVILEGE_TYPE attribute
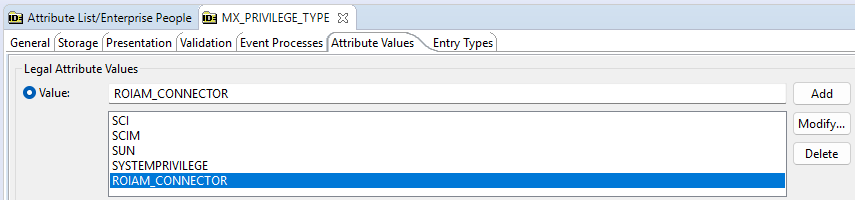
- Open the ID store and modify the MX_PRIVILEGE_TYPE attribute by adding
ROIAM_CONNECTORas a value.
- Open the ID store and modify the MX_PRIVILEGE_TYPE attribute by adding
Configure the Keys.ini constant
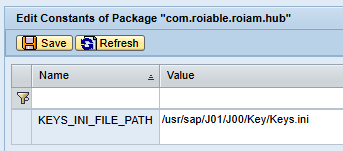
- In the
com.roiable.roiam.hubpackage, set the KEYS_INI_FILE_PATH constant to the path of the encryption key file.
INFO
Use the same value used by the IdM Developer Studio. In NWA, Java System Properties -> Applications -> idmdevstudio, look for property
com.sap.idm.rcp.crypt.keyfileand use its path for the HUB package constant.- In the
HUB repository configuration
Populate configuration constants
Populate the configuration constants with the information for the
ROIAM_HUB_<landscape>repository, related IdM GUIDs, and proxy details:ROIAM_APIMGMT_HOST– Host for the ROI iAM Application Management.ROIAM_APIMGMT_CLIENT_ID– Client ID for ROI iAM Application Management.ROIAM_APIMGMT_CLIENT_SECRET– Client secret for ROI iAM Application Management.ROIAM_ENDPOINT_EVENT_PROV– ROI iAM Event Provisioning endpoint.ROIAM_ENDPOINT_SCIM– ROI iAM SCIM endpoint.ROIAM_ENDPOINT_OAUTH– ROI iAM OAuth endpoint.ROIAM_PROXY_AUTH_TYPE– Authorization type for the ROI iAM IdM Proxy application.ROIAM_PROXY_HTTP_USER– Connection user for the ROI iAM IdM Proxy application.ROIAM_PROXY_HTTP_PASSWORD– Connection password for the ROI iAM IdM Proxy application.ROIAM_PROXY_SERVICE_URL– Service URL for the ROI iAM IdM Proxy application.ROIAM_EVENT_<eventName>– ROI iAM event type ID representing the IdM CreateUser plugin.ROIAM_SCHEMA_<eventName>– ROI iAM schema identifier used for<eventName>event data.ROIAM_FORM_<eventName>– GUID of the form used as the attribute source for<eventName>.ROIAM_UID_MAPPING_ATTR_IDM– The attribute to which the IdM user will be mapped to the ROI iAM identity (e.g. MX_MAIL_PRIMARY, MSKEYVALUE).ROIAM_UID_MAPPING_ATTR_ROI– The column/attribute to which the IdM user will be mapped to the ROI iAM identity - currently supported attributes are email and userName.
INFO
ROI iAM configuration details will be provided by the responsible team. It is recommended to use the already configured ROIAM_TECH for the Proxy connection.
Users' initial load from ROI iAM HUB
INFO
This step confirms that the connection from IdM to ROI iAM is working properly. Users should already be loaded in ROI iAM to fulfill all steps.
Execute the "Full load - ROI iAM Identities" job for the configured
ROIAM_HUB_<landscape>repository and confirm successful execution.Verify that all ROI iAM users appear in the temporary table:
roiam_%$rep.$NAME%_users
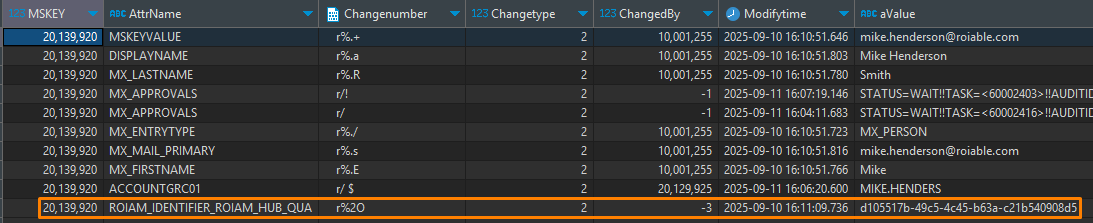
In IdM, ensure the same users have attribute
ROIAM_IDENTIFIER_<hubName>populated.
- Once all actions are completed successfully, the "Delta load - ROI iAM Identities" job can be executed and scheduled for daily synchronization. For optimal results, execute this job right after the standard "Load Users" job for the target HR system.
Cloud Connector Configuration
WARNING
Two of the prerequisite subaccounts configured in SAP BTP for ROI iAM must be connected to the SAP Cloud Connector: Subaccount A – Security (ROI iAM) and Subaccount B – Integration (SAP Integration Suite).
Connect the Subaccounts
The steps should be performed for both A and B subaccounts.
- Log in to the SAP Cloud Connector administration UI.
- Choose Add Subaccount.
- Maintain the following parameters:
Region- The SAP BTP region where the subaccount is hosted.Subaccount- The technical name of the SAP BTP subaccount.Display Name- Descriptive name for easier identification.Subaccount User- User with sufficient permissions in the subaccount.Password- Password for the subaccount user.
- Save the configuration - The subaccount should appear with status
Connected.
Configure the "Cloud to On-Premise" system
The steps should be performed for both A and B subaccounts.
- Choose the relevant subaccount - Cloud to On-Premise.
- Select Add System Mapping.
- Maintain the following:
Back-end Type- Select Non-SAP System.Protocol- Select HTTPS.Internal Host- Hostname of the SAP IdM system.Internal Port- HTTPS port of the SAP IdM system.Virtual Host- Logical hostname exposed to SAP BTP.Virtual Port- Port exposed to SAP BTP.Allow Principal Propagation- Empty.Principal Type- X.509 Certificate.
- Save the configuration - The system should be displayed with status
Reachable.
Maintain the resources of the "Cloud to On-Premise"
This step should be configured only for Subaccount B – Integration (SAP Integration Suite).
- After defining the system mapping, resources must be exposed.
- Add the following resource:
URL Path- /idm-proxy-rest/Active- Checked.Access Policy- Path and All Sub-Paths.
BTP Destination Configuration
The steps should be performed for both A and B subaccounts.
- Go to the subaccount which was connected to the Cloud Connector.
- Open the destinations and create a new one From Scratch:
Name- Logical name of the destination.Type- Select HTTP.Description- Optional description of the destination.Proxy Type- Select OnPremise.URL- Virtual host and port defined in the Cloud Connector.Location ID- Identifier of the Cloud Connector instance.Authentication- BasicAuthentication.User- The newly created ROIAM_TECH user.Password- The password of the ROIAM_TECH user set in the target UME.- One additional property:
Key- roiam_destinationValue- true